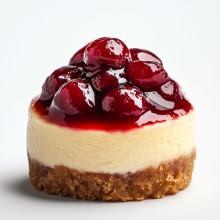


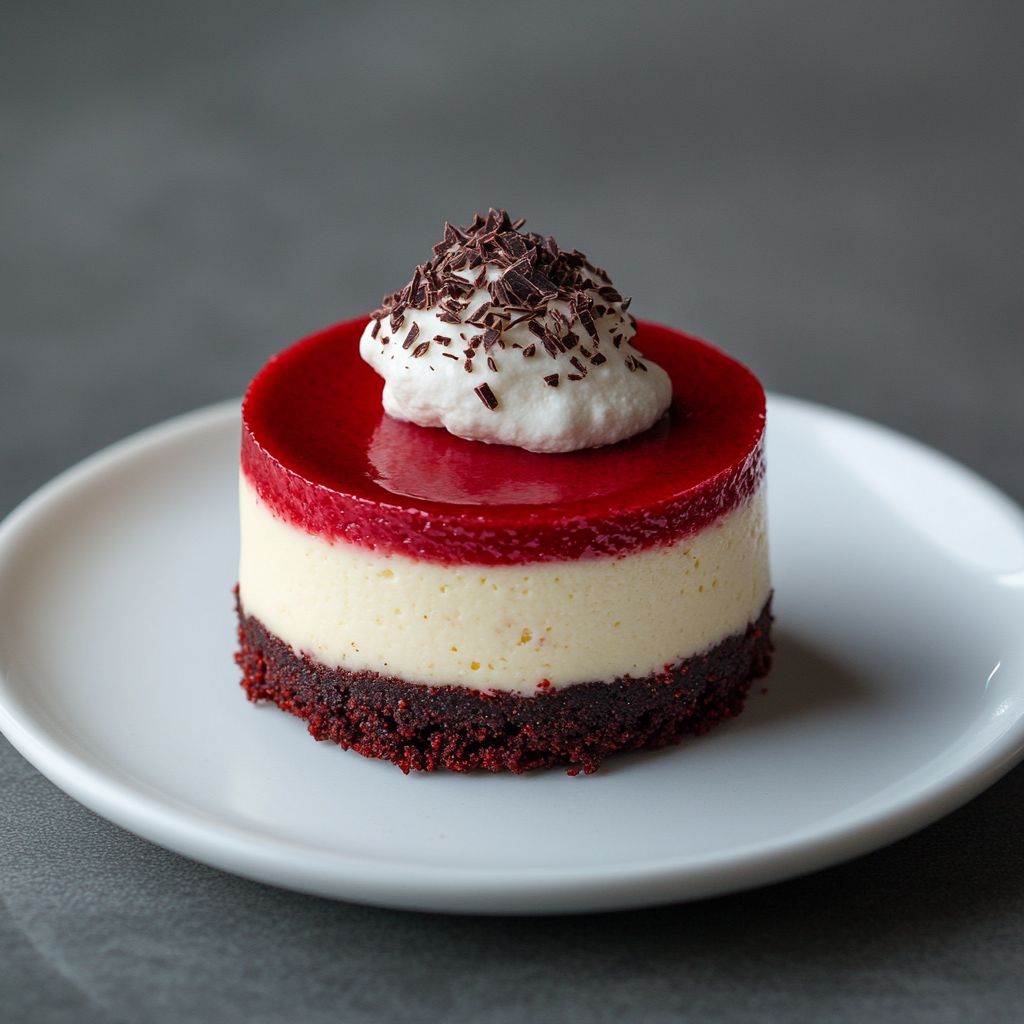
Red Velvet Mini Cheesecake
Published: 14/09/2025 By Mia Hernandez
Red Velvet Mini Cheesecakes: A Bite-Sized Indulgence
If you’re looking for a dessert that beautifully combines elegance and decadence, your search ends here with the delightful Red Velvet Mini Cheesecake. These charming little treats are not just a feast for the eyes—they deliver an explosion of flavor with every bite. Imagine a velvety crimson exterior that hints at chocolate, paired with the creamy richness of cheesecake. They are as captivating as they are delicious, making them perfect for any occasion, whether it be a lavish celebration or a simple evening treat.
The origins of red velvet cake are nothing short of fascinating. This iconic dessert, which gained prominence in the mid-20th century, has evolved into a staple of American baking, particularly through its association with extravagant celebrations such as weddings and anniversaries. The deep, mysterious red color, which is often achieved through cocoa powder and buttermilk, gives it a stunning appearance that is sure to impress your guests. However, the truth is, the color was once a happy accident derived from the chemical reactions between certain ingredients. Today, it remains a vibrant symbol of whimsy and indulgence.
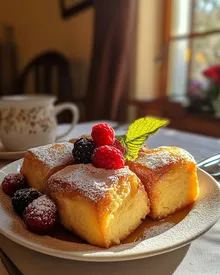
Now, imagine taking that classic red velvet flavor and transforming it into a mini cheesecake format. You are left with dessert perfection: bite-sized, luscious, and absolutely irresistible. Each mini cheesecake boasts a buttery graham cracker crust, supporting a rich mixture of cream cheese, sugar, and the signature red velvet flavor. Topped with a layer of luscious cream cheese frosting and garnished with scratches of chocolate or a sprinkle of red velvet crumbs, each mini cheesecake is the epitome of comfort food glorified for special occasions.
One of the best parts of this recipe is its versatility. While red velvet is a beloved classic, these mini cheesecakes can easily be adapted to suit different preferences and dietary needs. For a lighter option, you can substitute lower-fat cream cheese or Greek yogurt. For those with gluten sensitivities, gluten-free graham crackers can be used for the crust, ensuring that no one feels left out at the table. And let’s not forget about the flavor possibilities! Though the classic red velvet is a winner, you can easily add a twist of flavor by infusing spices or liqueurs into the mix for a unique take on tradition.
These delightful mini cheesecakes are not only about taste; they also make a striking visual statement. Imagine presenting a tray full of these perfect little rounds at your next gathering, adorned with dollops of cream cheese frosting and perhaps a few chocolate shavings or a drizzle of chocolate sauce. The vibrant red color juxtaposed against the creamy white frosting creates a stunning contrast that is sure to capture attention. It's a dessert that can easily elevate the aesthetic of any event, from casual family dinners to fancy cocktail parties.
Preparing these little gems is also surprisingly straightforward. With just a few ingredients and a little bit of time, you can create a dessert that looks and tastes like it came straight from a high-end bakery. The recipe involves simple steps: making the crust, preparing the red velvet filling, and assembling the cheesecakes in charming muffin tins. It’s an excellent opportunity to engage with loved ones in the kitchen, whether you’re teaching your children how to bake or having a fun night with friends. Sharing the process of creating these delightful treats can enhance your enjoyment of them, making every bite feel even more rewarding.
As you prepare to indulge in the world of Red Velvet Mini Cheesecakes, remember that these treats are just as perfect for treating yourself as they are for entertaining guests. Sometimes, the best way to celebrate life’s small moments is to savor a delicious dessert—especially when it comes in a cute, bite-sized package. Imagine pulling out a mini cheesecake from the fridge after a long day at work, slowly unwrapping it, and savoring that first decadent bite. It’s a moment worth cherishing.
Whether you decide to crown your mini cheesecakes with a sprinkle of crushed walnuts, a dollop of whipped cream, or simply allow the luscious red velvet flavor to be the star of the show, one thing is for sure: these treats will be talked about long after the last crumb has disappeared. So, gather your ingredients, and prepare to be amazed by what you can create in your own kitchen. Your family and friends will undoubtedly rave about your efforts, and you might just find yourself designated as the dessert expert in your social circle.
With the holiday season fast approaching, this recipe becomes even more relevant. Imagine the joy you’d spread by gifting a batch of these beautifully packaged mini cheesecakes to friends and family. They not only taste fantastic but also exude thoughtfulness and care, making them the perfect edible gift. And remember, they can be made in advance and stored, ready to impress at a moment’s notice!
As you embark on this journey of creating Red Velvet Mini Cheesecakes, let the flavor guide you through the experience. From their stunning appearance to their rich, creamy taste, every aspect of this recipe offers something special. You’ll find joy in both the simplicity of the process and the delight of your creations. So preheat your oven, get your mixer ready, and prepare to bake something extraordinary. Enjoy the adventure of creating these stunning little desserts and treat yourself—and those you love—to an unforgettable culinary experience!
Ingredients
- Crust
- 1 cup graham cracker crumbs
- 1/4 cup unsweetened cocoa powder
- 1/4 cup granulated sugar
- 1/2 cup unsalted butter melted
- Cheesecake Filling
- 16 oz cream cheese softened
- 1/2 cup granulated sugar
- 1/4 cup sour cream
- 2 large eggs room temperature
- 1 tbsp red food coloring
- 1 tsp vanilla extract
- 1 tsp lemon juice
- Optional Topping
- Whipped cream
- Chocolate shavings
- Fresh berries
Instructions
- Preheat your oven to 325°F (160°C) and line a 24-cup mini muffin tin with paper liners or grease it well.
- In a medium mixing bowl, combine the graham cracker crumbs, unsweetened cocoa powder, granulated sugar, and melted unsalted butter. Mix until the crumbs are evenly coated with butter.
- Press the mixture firmly into the bottom of each muffin cup to form the crust, using a small measuring cup or your fingers to ensure it's packed tightly.
- In a large mixing bowl, beat the softened cream cheese with an electric mixer until smooth and creamy.
- Add the granulated sugar, sour cream, and mix until well combined.
- In a separate bowl, whisk the eggs until lightly beaten. Add the beaten eggs, red food coloring, vanilla extract, and lemon juice to the cream cheese mixture. Mix until just combined, being careful not to overmix.
- Spoon the cheesecake filling evenly over the crusts in the mini muffin tin, filling each cup about 3/4 full.
- Bake for 15-18 minutes, or until the edges are set but the centers still have a slight jiggle.
- Remove from the oven and allow to cool in the tin for about 10 minutes before transferring to a wire rack to cool completely.
- Once cooled, refrigerate the mini cheesecakes for at least 2 hours, or until thoroughly chilled.
- If desired, top each mini cheesecake with whipped cream, chocolate shavings, and fresh berries before serving.
Notes
These Red Velvet Mini Cheesecakes are a delightful and elegant dessert option, perfect for special occasions or simply to satisfy your sweet tooth. The combination of the chocolatey graham cracker crust and the rich, creamy cheesecake filling creates a delicious contrast in flavors and textures. Feel free to customize your mini cheesecakes by adding your favorite toppings, such as whipped cream, chocolate shavings, or fresh berries for a burst of freshness.
To ensure a smooth texture for your cheesecake filling, it's important to have your cream cheese at room temperature before mixing. This helps avoid lumps and ensures that the filling is creamy and velvety. The red food coloring adds the signature red velvet look, but be sure to adjust the amount to achieve your desired shade.
After baking, allow the cheesecakes to cool completely before refrigerating them for at least 4 hours, preferably overnight. This chilling process allows the flavors to meld and the texture to set properly. If you want to serve them later, these mini cheesecakes can be made ahead of time and stored in the fridge, making them a fantastic dessert to prepare for gatherings. Enjoy the indulgence!
Faq
What ingredients are needed to make Red Velvet Mini Cheesecake?
You will need cream cheese, sugar, eggs, vanilla extract, red velvet cake mix, butter, and graham cracker crumbs for the crust.
How long does it take to prepare the Red Velvet Mini Cheesecake?
Preparation typically takes about 20 minutes, followed by baking for 20-25 minutes, plus cooling time.
Can I use a different type of crust for the mini cheesecakes?
Yes, you can substitute the graham cracker crust with Oreo cookie crust or any other cookie-based crust according to your preference.
How do I know when the mini cheesecakes are done baking?
The cheesecakes are done when the edges are set but the centers have a slight jiggle. They will continue to set as they cool.
Can I make these Red Velvet Mini Cheesecakes ahead of time?
Yes, you can prepare the mini cheesecakes a day in advance. Refrigerate them and top with frosting or decorations just before serving.
What can I use as a topping for the Red Velvet Mini Cheesecakes?
Common toppings include whipped cream, cream cheese frosting, chocolate shavings, or red velvet cake crumbs for extra flair.
Are there any gluten-free options for this recipe?
Yes, you can use gluten-free cake mix and gluten-free graham crackers to make a gluten-free version of the Red Velvet Mini Cheesecakes.
How should I store leftover mini cheesecakes?
Store leftover mini cheesecakes in an airtight container in the refrigerator for up to 3-4 days. You can also freeze them for longer storage.

Do you want to save this recipe?
Are you new to this website? This free email series is a great place to start. I'll walk you through some of my most popular recipes and show you how and why they work. You'll learn some practical concepts in the science of baking and quickly gain the knowledge you need to become a better baker.